Battery switch on travel trailer function is crucial for managing your RV’s power. Understanding how your battery switch works is key to preventing electrical problems and maximizing your off-grid adventures. This guide breaks down the different types of switches, how to use them safely, and what to do when things go wrong. We’ll cover everything from basic operation to troubleshooting and even installation.
Whether you’re a seasoned RVer or a newbie just getting started, mastering your battery switch is essential for a smooth and enjoyable camping experience. Think of it as the command center for your RV’s electrical system – understanding its function is vital for reliable power.
Understanding Battery Switch Functionality in Travel Trailers: Battery Switch On Travel Trailer Function
Your travel trailer’s battery switch is a crucial component, acting as the central control for your trailer’s battery power. It allows you to disconnect your house batteries from the trailer’s electrical system, preventing battery drain when the trailer isn’t in use and protecting sensitive electronics. Understanding its operation is essential for maintaining your trailer’s battery health and preventing unexpected issues.
Okay, so you’re wondering about your travel trailer’s battery system? It’s pretty straightforward once you get the hang of it. First, you’ll want to understand the purpose of the battery switch itself – check out this helpful guide on the battery switch on travel trailer function to get a solid grasp of the basics. Then, you can focus on actually using the switch to manage your house batteries and keep them charged.
This is where learning about battery switch on travel trailer function comes in handy – it helps you avoid draining your batteries while parked. Mastering this is key to a smooth and enjoyable camping trip!
Battery Switch Types in Travel Trailers
Travel trailers utilize different types of battery switches depending on their electrical system complexity and power requirements. The most common types are single, dual, and multi-stage switches. A single battery switch simply connects or disconnects a single battery bank to the trailer’s electrical system. Dual switches control two separate battery banks (often a house bank and a starting battery for the tow vehicle), allowing independent control over each.
Multi-stage switches offer more sophisticated control, often including an “off” position, a “house” position (powering only the trailer’s house systems), and a “both” position (powering both the house and starting batteries).
Operating a Battery Switch
Proper operation of your battery switch is straightforward but vital. Before operating the switch, ensure you understand its labeling. Most switches will clearly indicate the “off,” “house,” “start,” and “both” positions (if applicable). To disconnect your batteries completely, move the switch to the “off” position. To power only the house systems, select the “house” position.
Okay, so you’re wondering about your travel trailer’s battery? It’s super important to understand how that battery switch works. Check out this helpful guide on the battery switch on travel trailer function to learn about the basics. Knowing how to use it properly will prevent dead batteries and keep your lights on. This is especially crucial if you’re planning a long trip.
For more in-depth information, you might also want to explore this other resource on the battery switch on travel trailer function ; it covers troubleshooting and maintenance tips.
To power both the house and starting batteries (usually for situations where you need to boost the tow vehicle’s battery), select the “both” position. Always double-check the switch position before leaving your trailer unattended for extended periods.
Comparison of Battery Switch Types, Battery switch on travel trailer function
| Feature | Single Battery Switch | Dual Battery Switch | Multi-Stage Battery Switch |
|---|---|---|---|
| Number of Battery Banks Controlled | One | Two | One or Two (depending on the model) |
| Control Options | On/Off | On/Off for each bank | Off, House, Start, Both (or variations thereof) |
| Complexity | Simple | Moderate | Advanced |
| Cost | Low | Medium | High |
Connecting and Disconnecting Batteries
Connecting and disconnecting your travel trailer’s house batteries requires careful attention to safety procedures. Improper handling can lead to sparks, explosions, or acid burns. This section details the correct process and highlights crucial safety measures.Properly connecting and disconnecting your batteries ensures a reliable power supply for your appliances and prevents damage to your electrical system. Always remember that working with batteries involves potential hazards; taking precautions is paramount.
Safety Precautions When Working with Batteries
Before you begin any work with your batteries, always wear appropriate safety gear. This includes safety glasses to protect your eyes from potential splashes of battery acid, and rubber gloves to shield your hands from corrosive chemicals. It’s also a good idea to work in a well-ventilated area to avoid inhaling any harmful fumes. Never smoke near batteries, as the fumes are highly flammable.
If you spill battery acid, neutralize it immediately with baking soda and water, then clean the area thoroughly.
Connecting House Batteries to the Travel Trailer’s Electrical System
Connecting your house batteries involves attaching the positive (+) and negative (-) terminals to the designated points in your travel trailer’s battery system. Typically, this involves using heavy-duty battery cables with appropriately sized connectors. Ensure all connections are clean and tight to prevent voltage drops and potential overheating. Always connect the positive cable first, then the negative cable.
When disconnecting, reverse this process; remove the negative cable first, then the positive cable.
Disconnecting House Batteries from the Travel Trailer’s Electrical System
Disconnecting your house batteries is equally important, especially for extended periods of storage. This prevents parasitic drain, which can slowly discharge your batteries over time, leaving you with a dead battery when you need it. Follow the same safety precautions mentioned earlier. Remember to disconnect the negative cable first, then the positive cable.
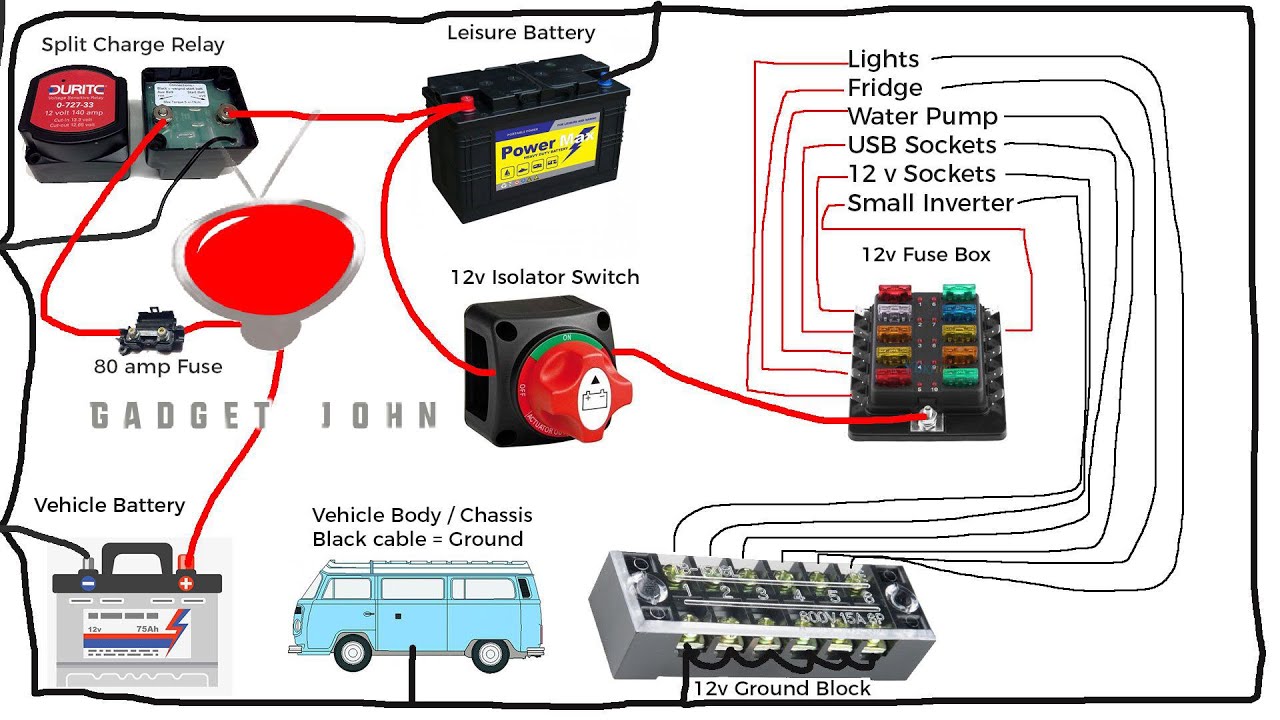
Visual Guide: Dual Battery System Wiring
Imagine a diagram showing two 12-volt batteries labeled Battery 1 and Battery 2. Each battery has a positive (+) and negative (-) terminal. From the positive terminal of each battery, a heavy-gauge red wire runs to a bus bar (a central distribution point). Similarly, from the negative terminal of each battery, a heavy-gauge black wire runs to the same bus bar.
From the bus bar, additional wires branch out to the various components in the travel trailer’s electrical system, such as the converter, inverter, and other appliances. The positive wires are all connected to one side of the bus bar, and the negative wires are connected to the other side. A main positive and negative cable runs from the bus bar to the battery switch.
The battery switch then connects to the trailer’s electrical system. This setup allows for parallel connection of the batteries, increasing the overall amperage capacity. Each connection should be secured with appropriate connectors and tightened to prevent loose connections. All wiring should be properly insulated and protected from abrasion.
Common Mistakes When Connecting or Disconnecting Batteries
A common mistake is connecting the negative cable first, which can create a spark and potentially ignite flammable gases. Another frequent error is using undersized cables, which can lead to overheating and voltage drops. Failing to secure connections properly can result in loose connections, causing intermittent power or even short circuits. Finally, neglecting safety precautions, such as not wearing safety glasses or gloves, can result in serious injury.
Battery Switch Installation and Replacement

Installing or replacing a battery switch in your travel trailer is a straightforward task, but it’s crucial to do it correctly to ensure safe and reliable power management. Improper installation can lead to electrical problems, potentially causing damage to your trailer’s electrical system or even creating a fire hazard. This section provides a step-by-step guide to help you through the process.
Tools and Materials Required
Gathering the right tools and materials beforehand will make the installation much smoother and efficient. Having everything readily available prevents interruptions and ensures a safe working environment.
- New battery switch (choose the correct amperage rating for your system)
- Wrench or socket set (sizes appropriate for your battery terminals and switch mounting bolts)
- Screwdrivers (Phillips and flathead, depending on your switch and trailer wiring)
- Wire strippers/cutters
- Electrical tape
- Wire connectors (crimp-on or solder, depending on your preference)
- Safety glasses
- Gloves
- Multimeter (for testing circuits, optional but recommended)
Choosing the Right Battery Switch
Selecting the appropriate battery switch is paramount for safety and performance. The wrong switch could lead to overheating, system failure, or even fire.The most important factor is the amperage rating. This rating must be equal to or greater than the maximum current your battery system can draw. For example, if your system draws a maximum of 100 amps, you should select a battery switch with a 100-amp or higher rating.
Consider also the type of switch; a single-pole, double-throw (SPDT) switch is the most common for travel trailers, allowing you to select between battery power or shore power. Some more advanced switches offer additional features, such as an auxiliary battery connection for added convenience.
Step-by-Step Installation Guide
This guide assumes basic electrical knowledge. If you are uncomfortable working with electrical systems, consult a qualified electrician. Always disconnect the negative battery terminal before beginning any work.
- Disconnect Batteries: Disconnect the negative (-) terminal of both your trailer batteries.
- Remove Old Switch: Carefully remove the old battery switch, taking note of the wiring connections. Take photos if necessary.
- Prepare New Switch: Inspect the new switch and ensure it’s compatible with your wiring. If needed, prepare the wires for connection (strip insulation, etc.).
- Connect Wiring: Connect the wires to the new switch, matching the connections to those of the old switch. Use appropriate wire connectors and ensure connections are secure and properly insulated.
- Mount New Switch: Mount the new switch securely in its designated location.
- Reconnect Batteries: Reconnect the negative (-) battery terminals. Test the switch functionality, ensuring that it switches correctly between battery and shore power.
- Test System: Thoroughly test your electrical system to ensure everything is functioning correctly after installation. Check all lights, appliances, and other electrical components.
Implications of Incorrect Installation or Poor Maintenance
Neglecting proper installation or maintenance of your battery switch can result in several issues. A poorly installed switch may not make proper contact, leading to overheating and potential fire hazards. Loose connections can cause voltage drops, resulting in poor performance of appliances. Corrosion on the switch terminals can lead to resistance and ultimately failure. Regular inspection and cleaning of the switch terminals are crucial for long-term reliability and safety.
A faulty switch can also lead to premature battery failure due to inconsistent power supply.
Mastering your travel trailer’s battery switch is a simple yet powerful way to improve your RVing experience. From preventing battery drain to troubleshooting power issues, understanding this crucial component ensures smoother journeys and more enjoyable camping trips. Remember, safety first – always disconnect batteries before working on your electrical system. Happy travels!
Expert Answers
What happens if I leave my battery switch on all the time?
Leaving your battery switch on constantly can drain your batteries, especially if you have parasitic draws (devices using power even when turned off). It’s best practice to turn it off when not using the RV for extended periods.
How often should I test my battery switch?
Regularly checking your battery switch (at least once a year or before extended trips) can help prevent unexpected issues. A visual inspection for corrosion and a simple multimeter test for continuity can ensure it’s functioning properly.
Can I install a battery switch myself?
While possible, installing a battery switch yourself requires electrical knowledge and caution. If you’re unsure, it’s best to consult a professional RV technician to avoid damaging your system.
My battery switch is making clicking noises. What’s wrong?
Clicking noises often indicate a low battery voltage or a problem with the switch itself. Check your battery voltage and inspect the switch for any signs of damage. If the problem persists, it’s best to consult a professional.
